Change Number of Excel 2010 Recent Documents
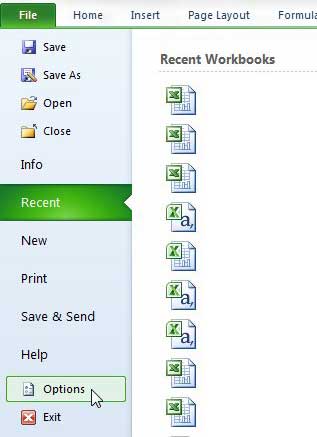
We have previously discussed the method for changing the number of recent documents in Word 2010, and the process for doing so in Excel 2010 is very similar. By customizing the number of documents that you are displaying in your Excel 2010 recent documents list, you are able to either make it more difficult for another user to find your documents, or you are able to make it simpler for you to find more of your documents. The choice is entirely up to you, and should be based upon the other people that have access to your computer and the sensitivity of the data that you handle in your Excel spreadsheets. Step 1: Launch Microsoft Excel 2010. Step 2: Click the File tab at the top-left corner of the window. Step 3: Click Options at the bottom of the menu on the left side of the window.
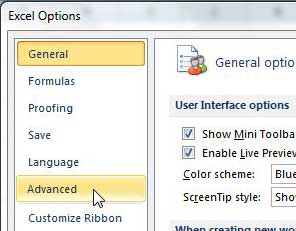
Step 4: Click Advanced in the column at the left side of the Excel Options window.
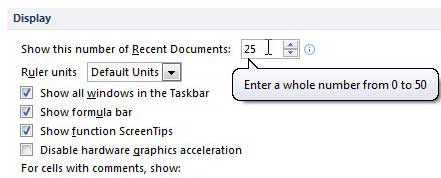
Step 5: Scroll to the Display section of the window. Step 6: Click inside the field to the right of Show this number of Recent Documents, then change the value to the number of recent documents that you want displayed in Excel 2010. Note that you can choose any number between 0 and 50.
Step 7: Click the OK button at the bottom of the window. When you return to the Recent menu on the File tab, you will see that the Recent Workbooks column has adjusted to show the number of documents that you just set. After receiving his Bachelor’s and Master’s degrees in Computer Science he spent several years working in IT management for small businesses. However, he now works full time writing content online and creating websites. His main writing topics include iPhones, Microsoft Office, Google Apps, Android, and Photoshop, but he has also written about many other tech topics as well. Read his full bio here.
You may opt out at any time. Read our Privacy Policy


