You can do a lot to customize your Windows computer, including the mouse pointer. Our tutorial below will show you how to change mouse cursor icons if you want to use one other than what is currently set.
How to Change Mouse Cursor in Windows 7
Our guide continues below with more information on how to change mouse cursor settings, including pictures of these steps. After using computer interfaces the same way for years, most of us have become accustomed to the standard options that come along with them. You are going to use a keyboard and mouse to navigate through the objects that you see on your screen, and there is a small icon on the screen that lets you know your current position on the screen. For most people this is a white, diagonally facing arrow. It is so ingrained in our habits that we think very little about using something different. here have been some recent changes to the basics of the interface, with the introduction of touch-based tablet computers, but this system has been in place and virtually unchanged because it is a good system. But if you want to switch things up, or if you are simply looking for a better option, you can change the mouse pointer settings on your Windows 7 computer to use a different icon. If you don’t know a password but you saved it to your browser, then read our view saved passwords on Google Chrome guide and see where to find that information.
How to Use a Different Mouse Cursor Icon in Windows 7 (Guide with Pictures)
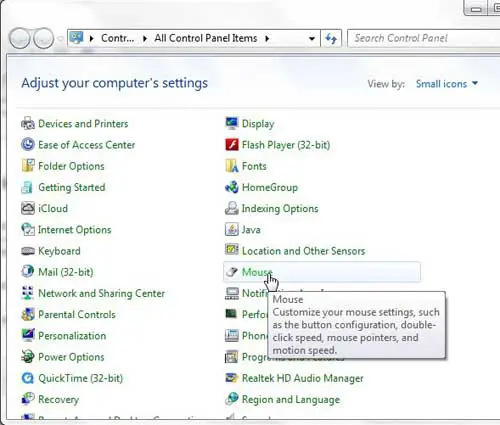
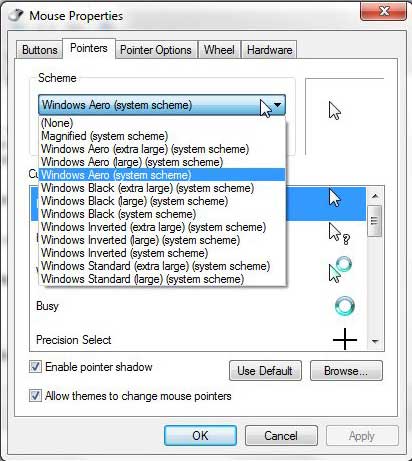
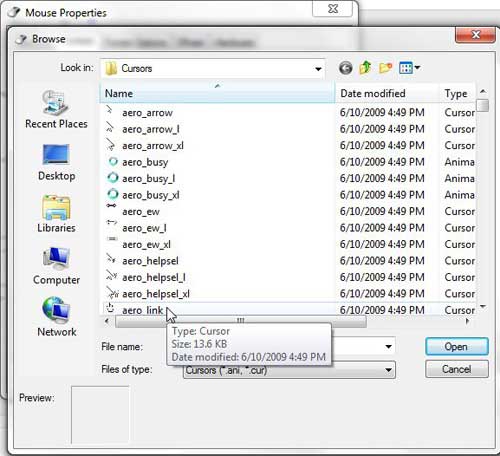
To begin with, I am going to assume that you have not installed any third-party programs for managing your mouse pointer options. If you have, then you will need to uninstall that program before proceeding with this tutorial. You can uninstall programs from the Programs and Features screen in the Control Panel. Step 1: Now that you have Windows 7 configured so that you are using the default mouse settings, return to the Control Panel. Step 2: Click the drop-down menu at the top-right corner of the window, next to View by, then click the Small icons option. Step 3: Click the Mouse option, which will open a new Mouse Properties window. Step 4: Click the Pointers tab at the top of the window to display a new menu that you can use to select your preferred pointer settings. Step 5: Click the drop-down menu under Scheme to choose from one of the other default pointer sets available to you. If you find a new scheme option that you are happy with, you can simply click Apply, then OK at the bottom of the window. However, if you want to go in a more unconventional direction, click one of the pointers in the Customize section of the window, then click the Browse button. Choose one of the other icon options in this folder, then click the Open button. This is the feature that allows you to choose any cursor or pointer that you want to use in your currently selected Windows 7 scheme. After selecting your new pointer, click Apply, then click OK to begin using the new option. If you want to make other changes to your Windows 7 mouse pointer, you can also click the Pointer Options tab at the top of the window, then adjust settings like Motion and Visibility. This is the menu where you should go if you want to learn how to slow down or speed up your mouse pointer.
Additional Sources
After receiving his Bachelor’s and Master’s degrees in Computer Science he spent several years working in IT management for small businesses. However, he now works full time writing content online and creating websites. His main writing topics include iPhones, Microsoft Office, Google Apps, Android, and Photoshop, but he has also written about many other tech topics as well. Read his full bio here.
You may opt out at any time. Read our Privacy Policy


