A dropdown list is an effective way to manage this. Our tutorial below will show you how to add one to your Excel spreadsheet. Creating a drop down list in Excel 2010 is something that seems like it should be fairly simple, as it’s a helpful item to have, and there are a lot of uses for it. But if you’ve ever tried to make a dropdown in Excel, then you may have found that it’s a little more complicated than it seems. If you are entering data into a spreadsheet, or if you are creating a spreadsheet for others to use, then it is typically a good idea to make everything as easy as possible. One good way to do this is with the inclusion of drop-down lists. When you have a cell that can only have a few different options, such as a month, day of the week, or even a really long option that you do not want to re-type repeatedly, then a drop-down list cannot only save you time, but also help to avoid any misspellings or typos. Our guide below will show you how to create a drop-down list in Microsoft Excel 2010.
How to Make a Drop Down in Excel 2010
There are some other settings you can or should apply to the list, which we discuss below. Our article continues below with more information and pictures for these steps.
Adding a Drop-Down List in Excel 2010 (Guide with Pictures)
The steps in the article below will result in a drop-down list that you can click to select an option. This is ideally used in situations where you are looking for a specific value or type of text to occur in a cell, and you want to avoid problems that can arise when people manually enter the values themselves.
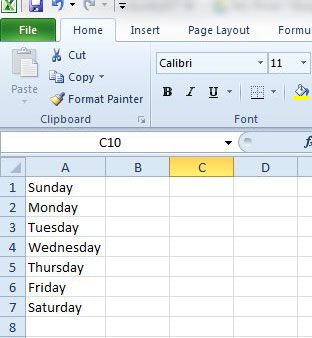
Step 1: Open your spreadsheet in Excel 2010.
Step 2: Type the items that you want to include in the list into a column in your spreadsheet. It does not need to be the first column. It can be any column you wish.
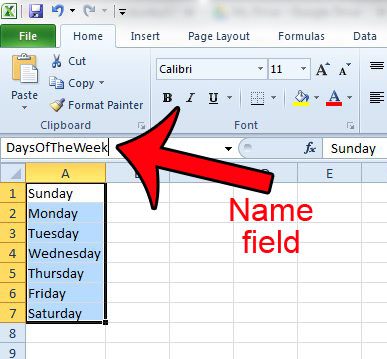
Step 2: Use your mouse to select all of the items to include in the list, type a name into the Name field above the top-left corner of the spreadsheet, then press the Enter key on your keyboard. Note that you cannot use any spaces or special characters when creating this name.
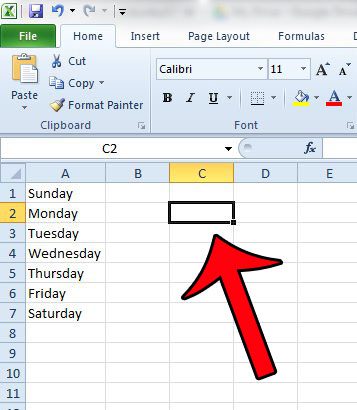
Step 4: Select the cell where you want the drop-down list to appear.
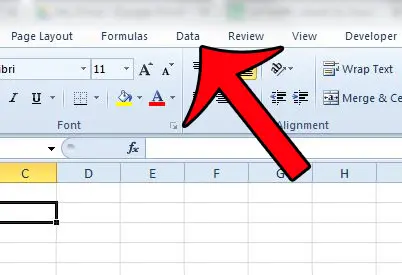
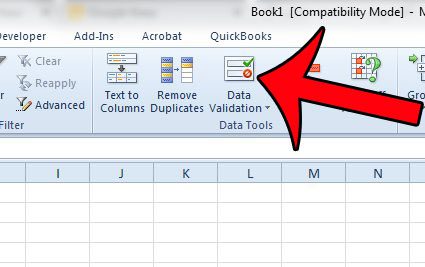
Step 5: Click the Data tab at the top of the window.
Step 6: Click the Data Validation button in the Data Tools section of the Office ribbon.
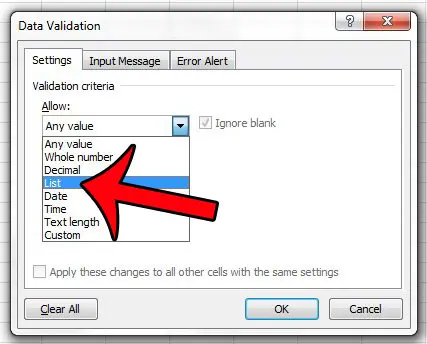
Step 7: Click the drop-down menu under Allow, then click the List option.
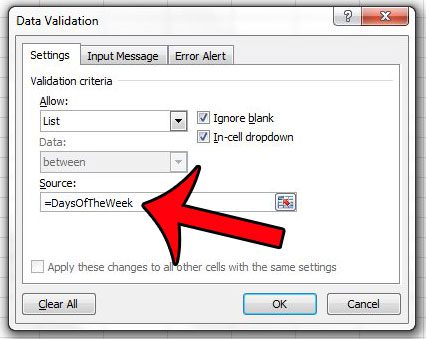
Step 8: Type an “=” sign into the Source field, followed by the name that you created for your range of cells. For example, I am typing =DaysOfTheWeek in the image below.
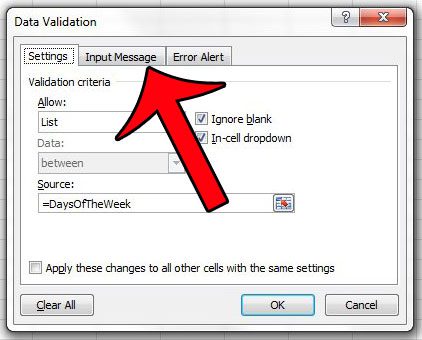
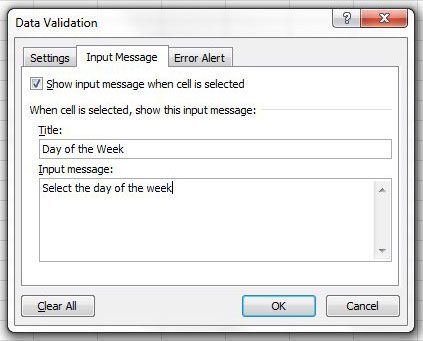
Step 9 (optional): Click the Input Message tab at the top of the window.
Step 10 (optional): Type a title for the drop-down list into the Title field, then type an input message into the Input Message field that you want to display whenever the cell is selected. This is a good place to add instructions for the drop-down list.
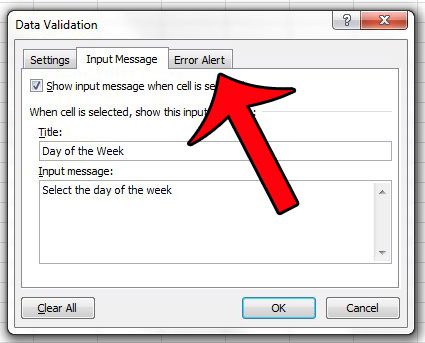
Step 11 (optional): Click the Error Alert tab.
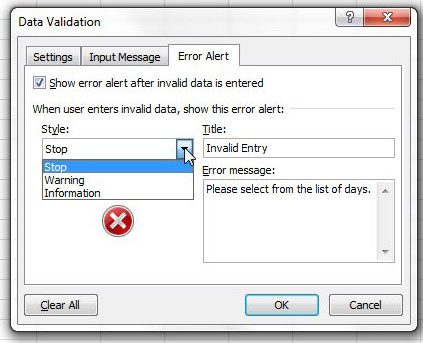
Step 12 (optional): Select the style of alert, then enter a title and message for the alert. Note that a Stop alert will prevent anyone from entering a value that is not on the list, while a Warning or Information style of alert will allow invalid entries and only inform the user that their entry is not valid.
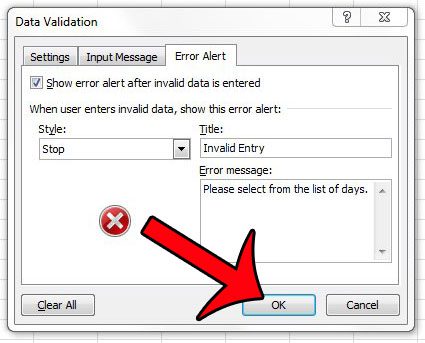
Step 13: Click the OK button at the bottom of the window to apply your settings.
You can make changes to the drop-down list by clicking the cell to select it, then clicking the Data Validation button on the Data tab. The first few times you create a dropdown list it’s likely that you will discover that there are some things you want to change. For example, if other people are going to be entering data, then you are probably going to want to customize the settings marked as “optional” above. These various alerts and validation settings help to reduce errors and eliminate confusion, which you may discover is a very important element of Excel dropdown menus. Do you need to print your spreadsheet, but there’s one column that is printing on its’ own page? This guide will show you how to force all of your columns to print on one page and save yourself some pages.
Related Guides
How to subtract in Excel How to sort by date in Excel How to center a worksheet in Excel How to select non-adjacent cells in Excel How to unhide a hidden workbook in Excel How to make Excel vertical text
After receiving his Bachelor’s and Master’s degrees in Computer Science he spent several years working in IT management for small businesses. However, he now works full time writing content online and creating websites. His main writing topics include iPhones, Microsoft Office, Google Apps, Android, and Photoshop, but he has also written about many other tech topics as well. Read his full bio here.
You may opt out at any time. Read our Privacy Policy
