Note: If you are using a new version of Word check out one of the following articles: How to Create and Print Booklets using Word 2013 How to Create and Print Booklets using Word 2016 Honestly, the only real work is coming up with the content, as Word will automatically print each page in the correct order with proper placement on the paper. Before you get booklet fever and go on a creative spree, first, we need to set up the page layout. Using booklet mode, Word 2010 will essentially shrink each page like it’s folded in half. We’ll talk more about the layout in step 3 below. Let’s get started!
How-To Create Booklets Using Microsoft Word 2010
Click File, then Print, and at the bottom of the list, click Page Setup.
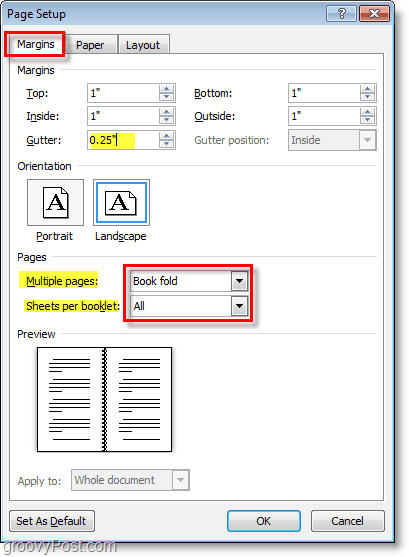
In the Page Setup window, click the Margins tab. Then under Multiple pages, select Book fold from the drop menu. Under Sheets, either select All or the exact amount of pages you plan on having. Be sure to set the gutter to a small margin. The gutter determines the space between your page content and the fold in the middle of the paper where you typically bind pages together.
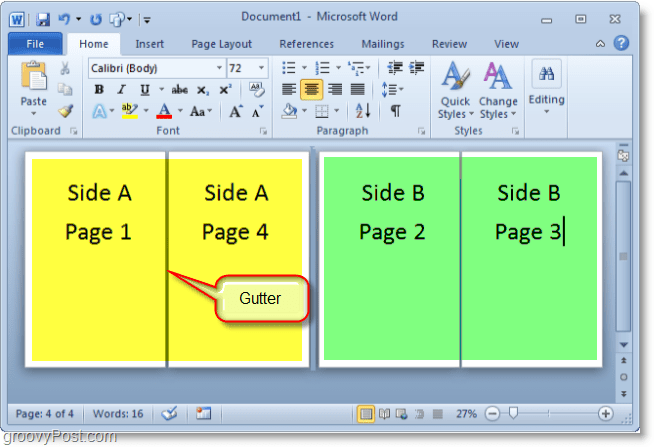
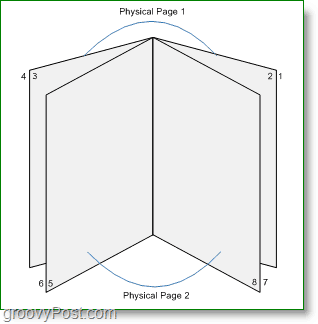
Create your booklet content, but keep in mind that content will print differently than a regular document. Page 1 and 4 will be printed on the same side, as Page 2 and 3 will be on the opposite side. Each page size shrinks to the scale of half a regular page in landscape mode. The image below should help illustrate.
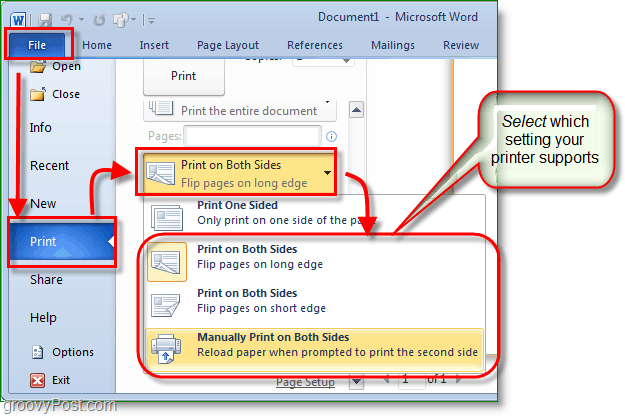
When you are ready to print, click File then Print, and change the printing preference to the correct setting for your printer. For example, if your printer can automatically re-feed printed documents, use one of the Print on Both Sides settings. If your printer requires you to manually re-insert your paper, select Manually Print on Both Sides.
Now you can continue adding pages and design your booklet to be as large as you like. Don’t forget that the larger you make your booklet, the larger you’ll need to make the Gutter, so page content doesn’t get lost in the cracks when you bind them together.
Questions, Comments? Drop one below or join the discussion in our free forums. Thank you so much! No more sleepless nights over this! :) I suspect that when the printer is given the booklet command directly, as well as getting a preset booiklet command from Word, the printer direct setting trumps. Good luck Not sure if you have solved the problem yet, but here is how I worked around the bug in Word 2010. When you are in the file tab on the ribbon, click on print. Under “Settings” you will see “Print all Pages”. Click on that and un-check “Print Markup”. Not sure why this works but it does. Also, it seems like “Print Markup” is a default setting that automatically checks itself, so you have to be sure it is unchecked every time right before you click print or else you will crash. Jill, it looks like there’s at least two of us looking for a solution to this issue (nice to have “company” anyway. :o) All, we don’t seem to be finding the solution in groovypost community … do any of you know if there are other Word communities that might know the “answer”? Rick If the document is not in Work, then you need to convert it to Word, and that may be where you would do a paste. However if you paste text from say a “text” file, you will have a lot of formating of the document to get it in the final format. Hope this helps. Elbert Two options for a cover page. One is to set up a seperate document using the booklet format. This will give you a cover page and 3 blank pages unless you put something in them. This is the technique I use as it is simpler than trying to get the pagination correct when you add a cover page in the main document. The second method is to build your cover page into the main document. If you do that, you have to decide if you want a blank page on the back side of the cover page or not. If so, then do this with page breaks. If you want the text to start on the back of the cover, then just format you cover page seperatly from the rest of the document. To format the cover page differently, build the page then go to Page layout, format and set up a new section for the first page. Be sure to keep the rest of the document as a single section (unless you need to break it into parts for other purposes). Hope this helps. Good luck. Elbert Not clear on exactly what your end product is to be. I am familiar with A4 & A5, and see the concept of getting it on A4 paper. It would appear that you will have to change the orientation of the Word doc to the paper, resulting in two sets of pages per A4 sheet. If you still have not sorted it out, let me know and give further details so I can be of more help. Elbert Elbert Elbert Elbert I was having the same problem! When you are in the file tab on the ribbon, click on print. Under “Settings” you will see “Print all Pages”. Click on that and un-check “Print Markup”. Not sure why this works but it does. Also, it seems like “Print Markup” is a default setting that automatically checks itself, so you have to be sure it is unchecked every time right before you click print or else you will crash. Instead, I’ve followed the advice above – which meant reformatting my whole document (tabs, font sizes, all the rest) – only to get a booklet where half the pages are upside down. Word 2010 is rubbish and I hate it. When you go to page set up the page setting is then portrait (because you are printing 2 single pages on the landscaped paper in portrait mode) and the flip is on the long edge because the booklet has a 5.5 inch width and 8.5 inch length and when you turn the pages you are using the long edge of the booklet. To everyone if you have booklet set on page setup and printer properties that creates havoc and that is the reason you print four pages on one side of the paper. You can only have booklet set in page set up. Hope this is helpful to you. Im trying to use word to make a booklet for my brothers wedding, Ive followed all the guidelines on here and everything is working except when I set the printer on Duplex to print on both sides of the paper, it prints the otherside upside down. Can anyone help me sort this out, his Weddings on Saturday and im running out of time. The printer that I have is a Koak ESP7250 and im running on Windows 7 Home premium. Many thanks (1) is the illustration after point 3 correct? I’m thinking that page 1 and 2 need be back-to-back on the sheet of paper, and page 3 and 4, too. So that means on the yellow page page 1 should be on the right and page 4 on the left. (2) When I try this tip my printer gives me one sheet with page 1 on the right and nothing on the left, one sheet with page 2 on the left and page 3 on the right, and one sheet with page 4 on the left and nothing on the right. Do I have a setting screwed up? How I can get page 1 and 4 on the same sheet? Suggestions? Am I doing something wrong, or does Word simply not provide that functionality? It may be that there is a bug in Word 2010. I’ve never used the “Sheets per booklet: All” setting as shown in Step 2. I know how many pages I expect my booklet to be and I set that number (4 pages, 8 pages) in the “Sheets per booklet” setting. The “All” setting may have a bug where the specific number of pages works correctly. Unfortunately, I no longer have a version of Word 2010 with which to test that theory. you could also make a simple numerical arrangement of your pages say from 1-10. meaning, one and ten will be on the sheet, two and nine, 3 and eight, 4 and 7 and finally 5 and 6 respectively. Using the option to Flip Pages on the Long edge DOES NOT work. Unlike the article says, this option is NOT EITHER-OR. Can anyone help me and tell me if this is possible???!! Comment Name * Email *
Δ Save my name and email and send me emails as new comments are made to this post.
![]()


