many computer applications offer ways to automate tasks, including Photoshop. Our tutorial below will show you a way to bulk crop Photoshop pictures.
Summary – How to Batch Crop Photoshop Images
Our guide continues below with additional information on how to crop multiple Photoshop images at once, including pictures of these steps. If you have a lot of pictures that need some basic editing, like cropping, then you may have been putting it off for a while to avoid performing that tedious activity over and over. Cropping one picture in Photoshop CS5 is not a difficult task, but doing it dozens or hundreds of times can be one of the most boring activities you ever encounter. Fortunately, Adobe realized that people that take a lot of pictures, or people that need to upload pictures to websites, might need a way to automate the process and learn how to crop many images in Photoshop. The process is actually very simple and can be used on as many images as you can fit in a single folder. Our guide to changing the color of a selection in Photoshop will show you how to recolor parts of your image.
How to Crop Multiple Images in Photoshop CS5 (Guide with Pictures)
This tutorial is going to assume that you are dealing with similar images that all require the same type of cropping. If you need to resize a folder of images instead, then consider replacing the Crop command that you are going to record in the tutorial below with the Image Size command on the Image menu. Before you begin actually cropping multiple photos in Photoshop, you need to do some organizational preparation with the images that will be the target of your cropping duties.
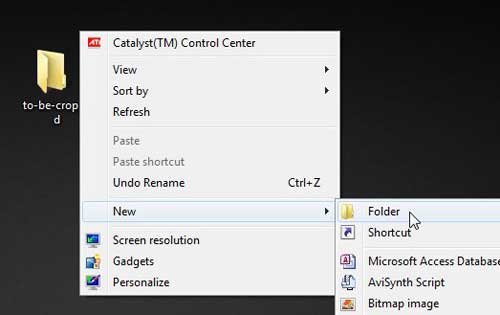
Step 1: Create a folder on your Desktop for the existing images that you want to crop, then give it a name that you will easily be able to remember, such as “to-be-cropped.”
You can create a file on your Desktop by right-clicking in the open space on the Desktop, clicking New, then clicking Folder. You can then type the name for the folder, and hit Enter when you are done.
Step 2: Create another folder on your Desktop where the cropped images will be saved, and give it another easily remembered name, such as “have-been-cropped.”
Step 3: Drag or copy all of your images into the “to-be-cropped” folder.
You will be leaving the “have-been-cropped” folder empty for now.
Step 4: Launch Adobe Photoshop, then open one of the images in your “to-be-cropped” folder.
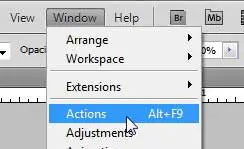
Step 5: Click Window at the top of the screen, then click Actions.
This will create the action that will be applied to each of your images.
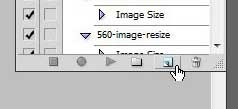
Step 6: Click the Create new action button at the bottom of the Actions panel, then type a name for the action. Use something that you can remember.
For example, I am going to be cropping all of my images to a 300 pixel width, so I will name the action “crop-300-width”. Click the Record button after you enter the name.
Step 7: Click the Rectangular Marquee Tool in the toolbox at the left side of the window, then draw the rectangle around the section of the image that you want to keep.
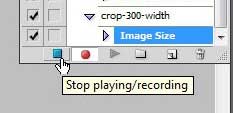
Step 8: Click Image at the top of the window, then click Crop. Once you are done, click the Stop playing/recording button at the bottom of the Actions panel.
Step 9: You can now close the image that you just cropped, but do not save it. It will be included when you automatically crop many pictures at once using the Automate command.
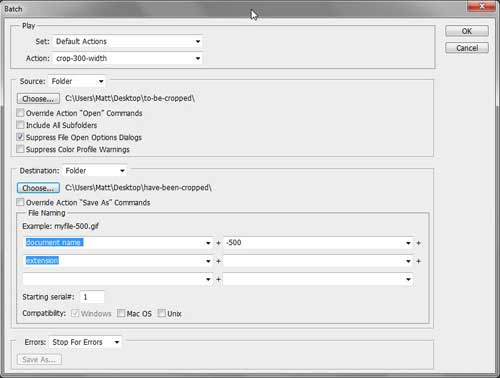
Step 10: Click File at the top of the window, click Automate, then click Batch.
Step 11: Click the drop-down menu to the right of Actions, then click the action that you just created.
Step 12: Click the Choose button in the Source section, then click the folder that contains all of the images you want to crop. (to-be-cropped)
Step 13: Click the Choose button in the Destination section, then click the folder you created earlier for the cropped files. (have-been-cropped)
Step 14: Click the top-left drop-down menu in the File Naming section, then choose document-name.
You can also type an extension in the field to the right of the document-name field. For example, I like to append the width of the image to the end of my file names but, since they are in different folders, this is not necessary.
Step 15: Click the drop-down menu under the one that currently says document-name, then click extension.
Your Batch window should now look something like this –
Step 16: When all of the parameters are set, you can click the OK button at the top of the window to execute the action.
Depending upon the type of images you are working with, you might need to press Enter after each image is cropped to complete the Save command. After all of the images have been cropped, navigate to your “have-been-cropped” folder and confirm that the cropped images are in the folder with their correct names and dimensions. Now that you know how to batch crop Photoshop images you will be able to use this process to quickly crop a lot of images and save yourself a significant amount of time. After receiving his Bachelor’s and Master’s degrees in Computer Science he spent several years working in IT management for small businesses. However, he now works full time writing content online and creating websites. His main writing topics include iPhones, Microsoft Office, Google Apps, Android, and Photoshop, but he has also written about many other tech topics as well. Read his full bio here.
You may opt out at any time. Read our Privacy Policy