Deleting Windows 7 Fonts
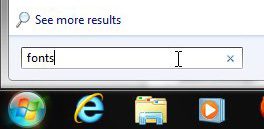
Fonts can be really helpful when you are trying to improve the visual appeal of a document or image, simply because it is such a simple change to make. Plus you can easily go back, select the word and choose a different font, if you so choose. When you couple that with the simplicity of actually installing a font in Windows 7, it is easy to see how you might become swamped in fonts. Note that, before you proceed with the steps below, deleting a font will completely remove it from your computer. If you wish to continue using it after deletion, you will need to locate (possibly online) and reinstall the font. Step 1: Click the Start button at the bottom-left corner of your screen, type fonts into the search field, then press Enter on your keyboard.
Step 2: Scroll through the list of installed fonts until you find the one that you want to delete. Step 3: Click the font once to select it, then click the Delete option in the horizontal blue bar at the top of the window.
Step 4: Click the Yes button to confirm that you wish to delete this font. Note that any text that you have written in a document with that font might appear differently the next time you open it. This is why it is important to confirm that you are absolutely certain that you want to delete a font before completing this step. After receiving his Bachelor’s and Master’s degrees in Computer Science he spent several years working in IT management for small businesses. However, he now works full time writing content online and creating websites. His main writing topics include iPhones, Microsoft Office, Google Apps, Android, and Photoshop, but he has also written about many other tech topics as well. Read his full bio here.