While sending hose pictures via text is an option, you might also be wondering how to email photos from IPhone 7 if you would rather send them in an email. Luckily this is one of the sharing options available to you when you select a picture in the Photos app.
How to Email a Picture on an iPhone 7
Our guide continues below with additional information on how to email photos from iPhone 7, including pictures of these steps. When you are running out of storage space on your iPhone and reading a guide on how to regain some of that space, one of the best ways to clear some room is by deleting your pictures. While these pictures can be backed up by uploading them to a service like Dropbox, you might decide to email some of your pictures to one of your own email addresses, or a family member’s email address, instead. But if you have never emailed a picture from your iPhone 7 before, then you might be wondering how to do so. While there are a couple of different ways to accomplish this, we will show you a method where you go into the Photos app, select the photos that you want to email, then create and send the message. Check out our tutorial on how to transfer iPhone photos to PC if you want to save all of your iPhone pictures to your computer.
How to Send a Picture from Your iPhone 7 in an Email (Guide with Pictures)
The steps in this article were performed on an iPhone 7 Plus, in iOS 10.3.1. This guide assumes that you have the following three items:
A picture that you want to send in an emailAn email address configured on your iPhoneThe email address of the person to whom you want to send the picture
If you have all of these items, then you can proceed below to email a picture from your iPhone 7.
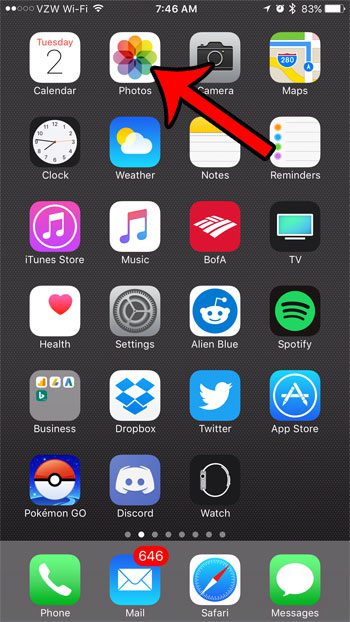
Step 1: Open the Photos app.
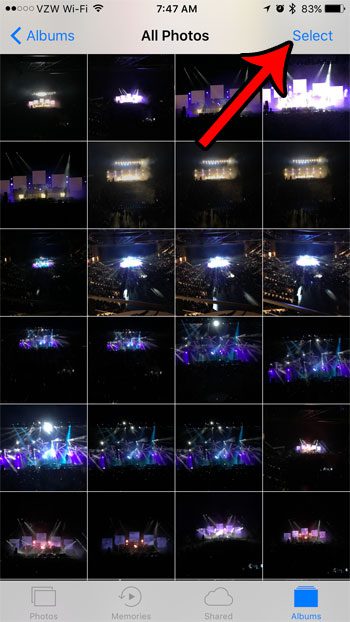
Step 2: Select the album containing the picture(s) that you want to send through email, then tap the Select button at the top-right corner of the screen.
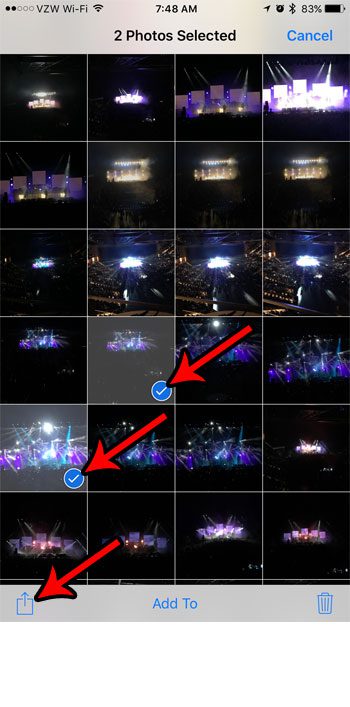
Step 3: Tap the picture(s) that you want to email, then touch the Share icon at the bottom-left corner of the screen.
It’s the square with an arrow coming out of it.
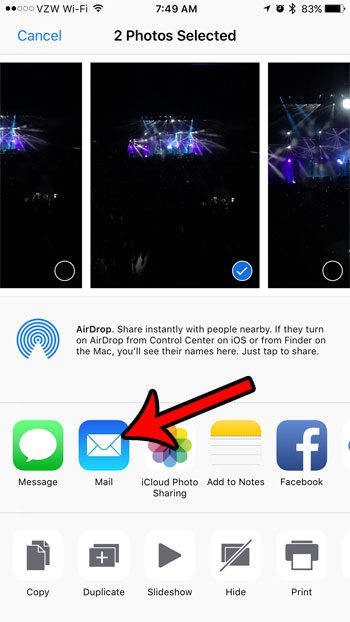
Step 4: Select the Mail option.
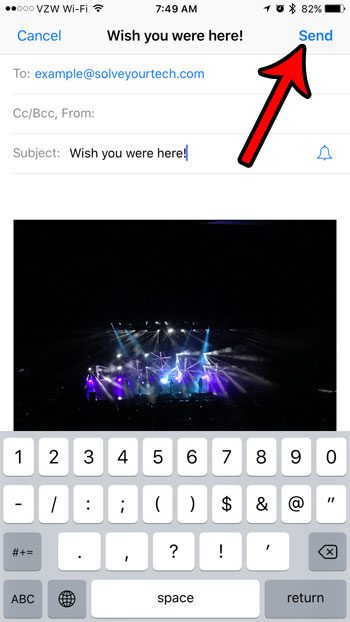
Step 5: Enter the email address of the intended recipient into the To field, enter a subject, add any necessary information to the body, then tap the Send button at the top-right corner of the screen.
Now that you know how to email photos from iPhone 7 you will be able to easily share your pictures with anybody whose email address you have. Note that, depending on the number and size of pictures that you are trying to email you might get a pop-up asking you to select the image size for the attachments. Some email providers may not accept emails with very large attachments, so it is generally safer to send the smaller-sized images. However, many popular email providers like Gmail and Yahoo can comfortably handle email attachments under 25 MB. If you have multiple email addresses on your iPhone and the device is trying to send it from the wrong one, then you might need to change your default email address. Your iPhone uses your default address whenever you type a new email message, so changing this setting can save you some time if you find that you are always switching to a different address.
Additional Sources
After receiving his Bachelor’s and Master’s degrees in Computer Science he spent several years working in IT management for small businesses. However, he now works full time writing content online and creating websites. His main writing topics include iPhones, Microsoft Office, Google Apps, Android, and Photoshop, but he has also written about many other tech topics as well. Read his full bio here.
You may opt out at any time. Read our Privacy Policy