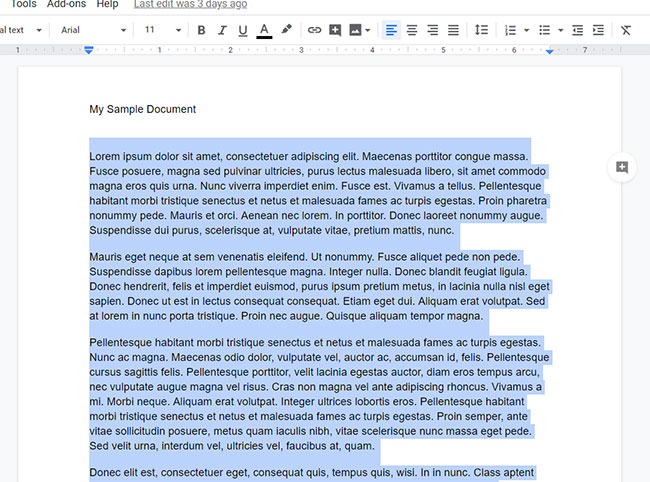
This variety in appearance can look pretty bad, especially when you are in a professional environment. Fortunately, there is a quick way to fix this by selecting everything in the document and applying the desired formatting settings.
How to Change the Font for My Whole Document in Google Docs
Our guide continues below with more information on selecting everything in a Google Doc and changing the font for the selection. When you type new content into a document in Google Docs, it will use the font that is currently set as the default. You can switch to a new font by simply clicking the Font dropdown menu in the toolbar above the document, then choosing the new font that you want to use. But if you need to switch existing text to a new font then you will need to know how to highlight the whole Google Doc so that you can change its font. You can change the font for existing text by selecting it, then choosing the desired font. This same method works for other types of formatting, too, such as text color, font size, and more. But if your entire document is in the wrong font, then the prospect of manually selecting all of that content may be unwelcome, and doing it can be tedious and frustrating. Fortunately, there is a quick way to select all of the text in a document, then you can change the font for that text all at once.
How to Change the Font for a Selection in Google Docs (Guide with Pictures)
The steps in this guide were performed in the desktop version of the Google Chrome Web browser but will work in other desktop browsers like Safari and Firefox as well.
Step 1: Sign in to Google Drive and open the Google Docs document.
Step 2: Click inside the body of the document, then press Ctrl + A (Windows) or Command + A (Mac.)
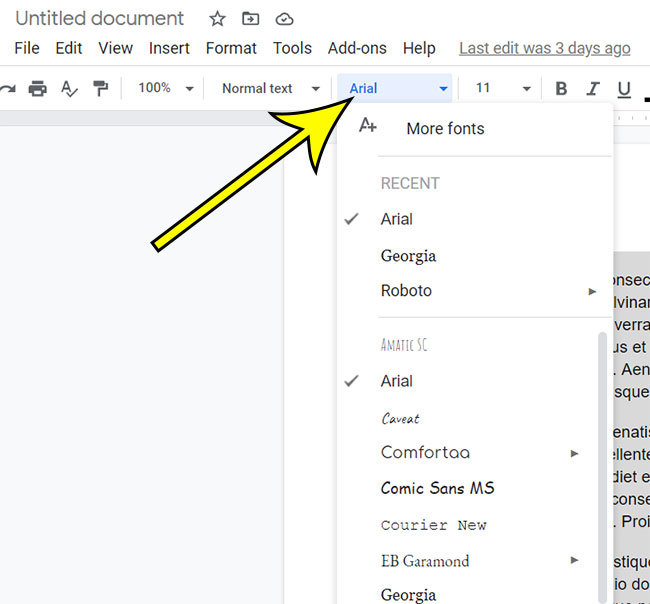
Step 3: Click the Font button in the toolbar, then choose the desired font.
Our tutorial continues below with more discussion on changing all of the fonts in a document.
Can I Select the Entire Document if I Am Using the Google Chrome Web Browser on My Phone?
When you are working with Google Docs on your mobile device, such as an iPhone or Android device, then the interface for the application is different than what you see on your laptop or desktop computer. If you open the Google Chrome mobile Web browser (or another mobile browser like Apple’s Safari) you can go to the Google Docs homepage at https://docs.google.com. There you can select the Google Docs file that you want to edit. Once you have the desired document open you can tap and hold anywhere in the document, then choose the Select All option from the input tools menu. If you are using the Docs app then you will need to tap the pencil icon at the bottom-right corner of the screen first so that you can enter the editing mode.
More Information on How to Highlight Whole Document in Google Docs and Change the Font
Another way that you can format a selection in Google Docs is to click the Format tab at the top of the window, then choose one of the options there. You will find things that let you bold, underline, or italicize text, as well as change the size of the font or its capitalization style. If you don’t see the font that you want to use in your document then you can click the Font button in the toolbar, then select the More fonts option from the top of the drop down menu. This is going to open a Fonts dialog box where you can browse through additional styles, as well as search for others. You can also select the entire document by clicking Edit at the top of the window, then choosing Select all. Almost all the keyboard shortcuts that you are familiar with from applications like Microsoft Office Word will work in Google Docs as well. For example, you can use the keyboard shortcut of Ctrl + U to underline selected text or Ctrl + Shift + E to center text that you have selected. Note that this will not affect the color or the size of the existing font. If you would like to change those formatting properties as well, simply select the desired value while the text is still selected. Google Docs uses something called Styles which you can utilize to apply predefined formatting options to selected text. For example, if you click the Format tab at the top of the window you can choose the Paragraph styles option then Normal text style to apply that to the selection. If you want to change that normal text style then you could select the Update normal text to match option instead. There isn’t a way to select the body, header, and footer at the same time. If you would like to change the font for the header or footer you will need to double-click in that area of the document, press Ctrl + A or Command + A to select everything in that section, then change the font.
if you would like to highlight changes then the document will need to be in Suggesting Mode. You can make this switch by clicking the blue Editing button at the upper-right corner of the window and selecting the Suggesting option. You can switch document modes by clicking the pencil icon at the top-right of the window, then choosing the Suggesting option. Now if someone makes a change to the document it will be a “suggestion’ instead of an “edit.” Simply open the document, click the File tab at the top-left of the window and choose Version history. You can then select a version to see what is different, and you can elect to revert to that version. But while those edits might be welcome, you may not want people to make changes to the actual document. By opting to put the document in suggesting mode you provide opportunities to comment on things without actually changing the document text. He specializes in writing content about iPhones, Android devices, Microsoft Office, and many other popular applications and devices. Read his full bio here.


