But Microsoft Word 2010 does not have an option to add a new font from within the application. This is because fonts for Microsoft Word 2010 are those that have been installed directly in Windows 7. Therefore, if you want to install a new font for your Microsoft Word 2010 document, then you need to install it through the Windows 7 interface. Our guide below will walk you through the process of taking a downloaded font file and accessing it in Word 2010. If you’re searching for a font that you can use for a signature or an invitation, then our guide on cursive fonts in Word can show you a number of different options that might meet your needs.
Installing New Fonts for Word 2010 in Windows 7
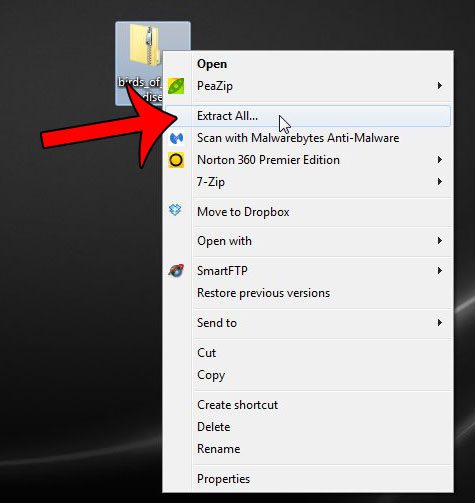
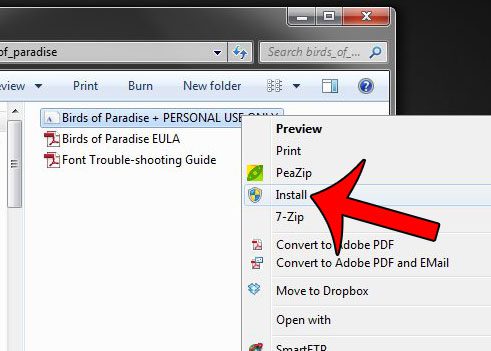
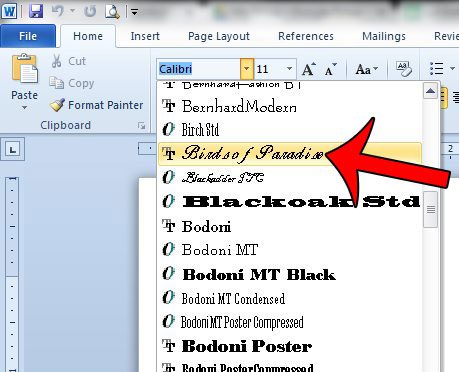
The steps in this article were written for Windows 7 users. These same steps will also work for Windows Vista and Windows 8. Note that this article will not be showing you how to download fonts to Word directly. This guide will be installing the font in Windows 7, which will subsequently make it available in Word 2010. We will assume that you already have the font that you want to use on your computer. Most fonts come in a zip file, so we will be including steps that show how to unzip the font file. If you do not already have the font you want to use, then you can download one from a site like dafont.com or 1001freefonts.com. You should also close Word 2010 before installing the font, otherwise it will not be available until after you restart the program. Remember to save your document before closing the program! Step 1: Locate the zip file containing the font that you want to install. Step 2: Right-click the file, then click Extract All. Step 3: Confirm that the box to the left of Show extracted files when complete is checked, then click the Extract button at the bottom-right corner of the window. Step 4: Right-click the font file in this folder (the icon should be a white rectangle with an A on it, and it is likely a TrueType font file) then click the Install button. You will then see a pop-up window indicating that the font is being installed. Note that if there are multiple font files in this folder, you may need to install each of those fonts separately in order to add the fonts to Word 2010. Step 5: Open Word 2010 after the font file has been installed, and you will be able to select it from your list of fonts. You will not need to take any additional options to import the font to Word. It should already be in the proper location. Note that the fonts in Word 2010’s list are displayed in alphabetical order. Note that after you have followed these steps to add a font to Word, the font will also be available in other programs that use the Windows 7 font repository. This include other Office programs like Excel, Powerpoint or Outlook, as well as non-Microsoft products, such as Adobe Photoshop. If you are using an unusual font and are sharing the Word file with someone else, then they may not be able to view it correctly if they do not have the same font on their computer. One way to avoid this is to embed font files in your Word document. This article explains how. After receiving his Bachelor’s and Master’s degrees in Computer Science he spent several years working in IT management for small businesses. However, he now works full time writing content online and creating websites. His main writing topics include iPhones, Microsoft Office, Google Apps, Android, and Photoshop, but he has also written about many other tech topics as well. Read his full bio here.
You may opt out at any time. Read our Privacy Policy