If you have edited a document in Word 2013 to have a background color, then you may have encountered a problem where you cannot print that background color. This is a setting that is primarily meant to affect the appearance of a document on a computer screen and is turned off for printing because it can use a lot of printer ink. But there are occasions where you might need to print a background color in Word 2013, so fortunately it is something that you can enable to allow you to print your document in the manner that you need it.
How to Print Background Color in Word
Our tutorial continues below with more information on printing your document with a background color, including pictures of these steps.
Printing Background Color in Word 2013 Documents (Guide with Pictures)
The steps in this article will teach you how to have your Word 2013 document print with the page color that you have added to the document. If you are trying to add a background color, you can read this article for help. Note that printing a background color can use a lot of your printer ink, especially if the document is more than one page in length.
Step 1: Open your document in Word 2013.
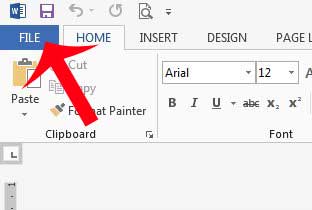
Step 2: Click the File button at the top-left corner of the window.
This tab opens the File menu or Backstage view of Microsoft Word 2013.
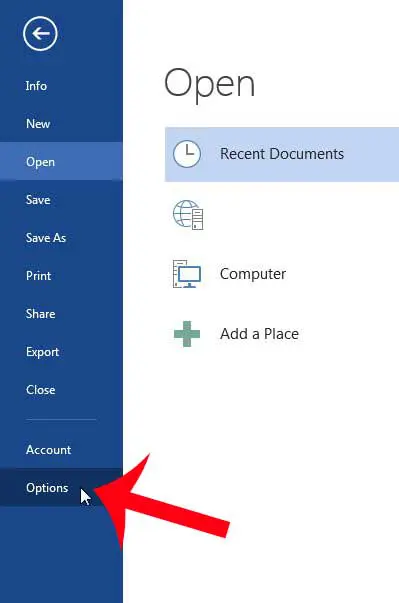
Step 3: Click Options at the bottom of the column on the left side of the window.
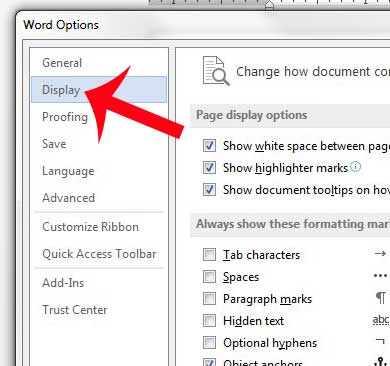
Step 4: Click the Display option in the left column of the Word Options window.
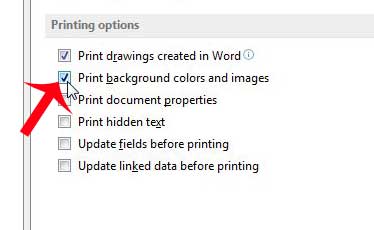
Step 4: Check the box to the left of Print background colors and images.
Step 5: Click the OK button at the bottom of the window to apply your changes and close the window.
You can then open the Print window to preview your document in Print Preview and print it with your background color. Including the background color when you print will typically use a lot of color ink. If you are able to, it’s often a good idea to print the document without the background color first if you are proofreading or editing.
How to Add a Background Color in Word
Now that we have changed the Word 2013 background print setting, you are ready to include a background color in your document. You can do this by clicking the Design tab at the top of the window, then selecting the Page Color button in the Page Background group of the ribbon. You can then click the color that you would like to use for your document. if you change the background color and find that the text is difficult to read, then you may need to change the text color for the entire document. you can do this by pressing Ctrl + A on your keyboard to select the entire document, then click the Home tab and choose the desired font color from the Font group of the ribbon.
How to Print in Color on Word 2013
If you are having trouble printing in color in Microsoft Word, rather than just printing a page background color, then it could be due to an issue with your printer. First, you need to confirm that you have a color printer. Many printers, especially laser printers, can only print in black and white. Every printer is different, but if you open Settings in Windows 10, choose Devices, then Printers & scanners, you should be able to select your printer, then click the Manage button. You can then navigate through the settings you find here and verify that you haven’t enabled a setting to only print in black and white. For example, there may be a Printer preferences link where you can click an Advanced button and choose the color mode there. Finally, if you have confirmed that you have a color printer with installed color cartridges and that the printer is able to print in color, you can open the Print menu for your document then click the Printer Properties button and confirm that the document is set to print in color mode instead of black and white or grayscale.
More Information on How to Print Background Color in Word 2013
Once you complete the steps in the guide above you will have changed a setting in Microsoft Word 0213, not just that individual document. Any document that you print in the future which includes a background color or background images will print those items as well. This setting will remain enabled even when you close and open Word again. If you need to stop printing the background color then you will need to go back to File > Options > Display and remove the checkmark from the Print background colors and images check box. The steps in this article were performed in Microsoft Word 2013, but will also work in most other versions of Microsoft Office as well. If you don’t see the page background color that you want to use in the color picker, you can click the More Colors option and either select a color from the Standard tab, or choose the Custom tab and select that way, or use a hex color. The setting that we change when printing background colors in Word mentions printing background images, too. A background image in Word can be added as a watermark. You can do this by going to Design > Watermark > Custom Watermark > then select the Picture watermark option and choose your picture. Is your document not properly aligning with your page? Change the vertical alignment in Word 2013 if you want to center the document or align it with the bottom of the page.
Additional Sources
After receiving his Bachelor’s and Master’s degrees in Computer Science he spent several years working in IT management for small businesses. However, he now works full time writing content online and creating websites. His main writing topics include iPhones, Microsoft Office, Google Apps, Android, and Photoshop, but he has also written about many other tech topics as well. Read his full bio here.
You may opt out at any time. Read our Privacy Policy


