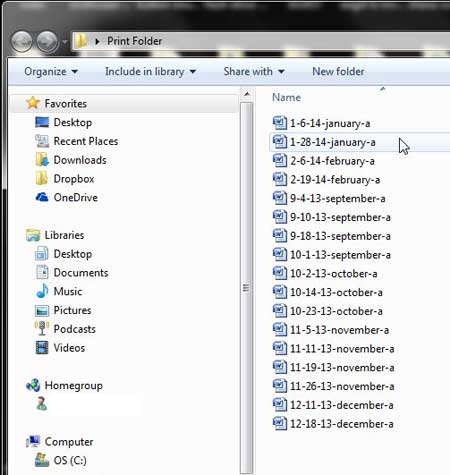
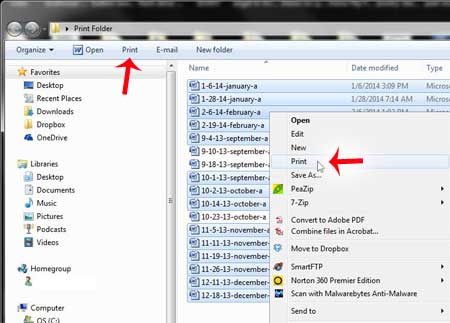
There are a lot of methods for increasing efficiency on a Windows computer, though these methods may not be immediately obvious, or even well-known to a lot of people. One option that you have in Windows 7 includes the ability to print multiple Word documents at once. If you do a lot of printing then this can wind up saving a surprising amount of time, as you won’t need to open each individual document, then navigate to the Print menu. The tutorial below will show you the steps to accomplish this.
How to Batch Print Word Documents
Our guide continues below with additional information on how to print multiple Word documents at once, including pictures of these steps. Need to change something about an entire document? Our Word 365 select all guide can show you a couple of ways to do that quickly. If you use Microsoft Word a lot, then you most likely need to print documents from time to time. When you are dealing with a single document, it is relatively easy to navigate to the Print menu and print that document. But this can be tedious if you have a number of documents that you need to print. Fortunately, Word is integrated into Windows 7 rather seamlessly, and you can print multiple Word documents at one time from a folder in Windows 7 by following the steps below.
Printing More than One Word Document at One Time in Windows 7 (Guide with Pictures)
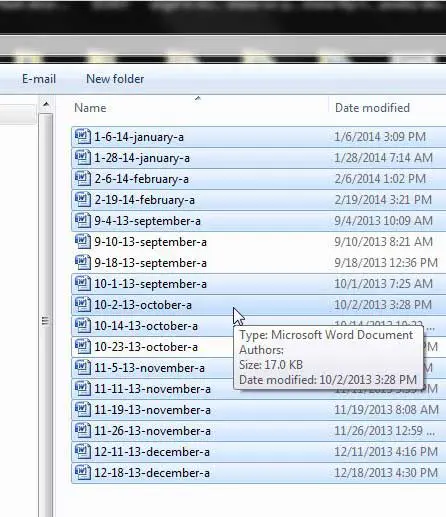
Note that the tutorial below is going to assume that all of the Word documents that you want to print are located in the same folder. If not, then you will need to move the files that you want to print into the same folder. Now that you know how to print multiple Word documents at once you will be able to apply this knowledge to future endeavors where you need to quickly create physical copies of multiple documents. If you don’t have all of the documents in the same folder, then you will need to move them into the same folder. You can always copy and paste the documents if you don’t want to change their location. You can select all of the documents in a folder by pressing Ctrl + A. This will work best if all of the documents are the same page size. If you have letter and legal documents, for example, you could encounter issues if your printer doesn’t have multiple paper trays. Word will need to open each of the files to print them but will close once each file has been printed. This will occur automatically, so you will not need to do anything while your files are being printed. Do you need to print address labels? You can learn how to print labels in Microsoft Word 2010 by reading this article. You can change the default printer in Windows 7 by clicking the Start menu, choosing the Devices and Printers option, right-clicking on the printer that you want to use, then choosing the Set as Default Printer option. Fortunately, you can simply keep holding down the Ctrl key and click on that file again to de-select it. If you have documents that are tough to identify by just their filename, then you can click on the file to select it, then press the F2 key. You will then be able to type a new name for the file, then press the Enter key when you are done.
After receiving his Bachelor’s and Master’s degrees in Computer Science he spent several years working in IT management for small businesses. However, he now works full time writing content online and creating websites. His main writing topics include iPhones, Microsoft Office, Google Apps, Android, and Photoshop, but he has also written about many other tech topics as well. Read his full bio here.
You may opt out at any time. Read our Privacy Policy


