You might even consider recreating the image if it’s possible, but if you have access to the Adobe Photoshop application then you might be able to use some of the tools there instead. Our tutorial below will show you how to use the clone and stamp tool in Photoshop to remove an unwanted element. People love to write words or text on images, whether it is part of a meme or as a means to express something that the image does not. However, if this image is a single-layer picture file like a JPEG, GIF, or PNG, then you may be struggling to remove the text without also deleting the background behind it. Luckily you can use the clone and stamp tools in Photoshop CS5 to replicate the background and paint over the text, giving you an image that is free from the distracting or unnecessary text that was added to it. Do you need something in your picture to be a different color? Our guide to changing the color of a Photoshop selection can show you how to do that.
How to Clone and Stamp to Remove Photoshop Text (Guide with Pictures)
One important thing to note before you do this is that there is a far simpler way to do this if you are working with a multi-layered file, such as a PSD or PDF file. If you have text in a file of that type, and it is saved as its own layer, then you can simply right-click the text layer in the Layers panel at the right side of the window, click the Delete Layer option, then click Yes to confirm the deletion. But if you are dealing with a single-layered file, then you can follow the instructions laid out below.
Step 1: Open the image in Photoshop CS5.
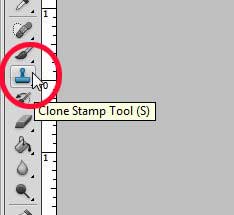
Step 2: Click the clone stamp from the toolbox at the left side of the window.
Step 3: Hold down the Alt key on your keyboard, then click your mouse on the background that you want to clone to cover the text.
Make sure to choose a background spot that will look correct when you use it to stamp over the text. You are basically using that point on which you just clicked as the source for the “paint” that you are using to cover the text.
Step 4: Release the Alt key, then start painting over your text.
You will notice a little + symbol that moves from your source as you are painting over the text. While you are holding down your mouse, your source is moving relative to your mouse. Since you are close to your text, this could result in the text becoming the source, which you do not want. So paint over part of the text, release the mouse, then paint over the next part of the text. Each time you release the mouse it resets the source, which will make your job much easier. This will probably take a little getting used to before you get the feel for how the clone and stamp work, but you should start to understand how it works once you have used the tool once or twice.
Summary – How to Remove Text from a Photoshop Image
Now that you know how to remove the text from a picture using the Adobe Photoshop application you can use a similar technique any time there is something in a picture that you need to get rid of. After receiving his Bachelor’s and Master’s degrees in Computer Science he spent several years working in IT management for small businesses. However, he now works full time writing content online and creating websites. His main writing topics include iPhones, Microsoft Office, Google Apps, Android, and Photoshop, but he has also written about many other tech topics as well. Read his full bio here.