Change the Default File Save Format in Excel 2013
While users of Excel 2003 can download a compatibility pack that allows them to open .xlsx files, many users either choose not to download it, or are unaware that it exists. And if you are working with people in this situation on a regular basis, your best course of action may be to adjust the types of files that you create in Excel 2013. Fortunately you can change the default file save format to ensure that you don’t need to remember to make the adjustment manually each time that you create a file. Step 1: Launch Microsoft Excel 2013. Step 2: Click the File tab at the top-left corner of the window.
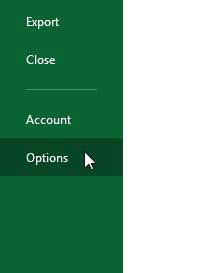
Step 3: Click Options in the column at the left side of the window.
Step 4: Click Save in the column at the left side of the Excel Options window.
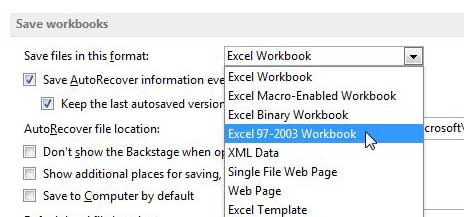
Step 5: Click the drop-down menu to the right of Save files in this format at the top of the window, then click the Excel 97-2003 workbook option.
Step 6: Click the OK button at the bottom of the window. Do you print a lot of your spreadsheets? You can learn how to print all of your columns on one page to make printing easier. After receiving his Bachelor’s and Master’s degrees in Computer Science he spent several years working in IT management for small businesses. However, he now works full time writing content online and creating websites. His main writing topics include iPhones, Microsoft Office, Google Apps, Android, and Photoshop, but he has also written about many other tech topics as well. Read his full bio here.