Your school or organization probably has some kind of formatting requirement that dictates the size of these margins, as it’s a useful place to include notes when others review your work. But you might be having trouble visualizing how your completed document will look and would like to be able to see something on the screen that indicates where the document body stops and the margins begin. You can show document margins in Microsoft Word by going to File > Options > Advanced > then checking the box next to Show text boundaries and clicking OK. The document that you see when viewing a file in Word 2013 in the Print Layout view is not actually representative of the space to which you can add content. There are margins, headers, and footers that can reduce the actual amount of space available to you for your document’s content. Since this can be problematic when creating certain types of documents, you may be looking for a visual aid that will help you to better recognize how much of the page is available to edit. Our tutorial below will show you how to place a dotted boundary around the content area of your Word 2013 document so that you can see what parts of the page are usable for your document’s body.
How to Show Text Boundaries in Word 2013
Our guide continues below with additional information on how to show a rectangle on your document that indicates the document margins, including pictures of these steps.
How to Display Dotted Line for Content Boundaries in Word 2013 (Guide with Pictures)
The steps in our guide below are going to show you the setting to change to display a dotted line around the content area of your document. This is a setting to the Word program itself, so it will appear for any document that you open in the program. Note that the text boundary will not print with the document.
Step 1: Open Word 2013.
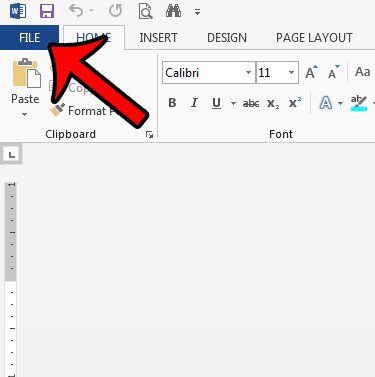
Step 2: Click the File tab at the top-left corner of the window.
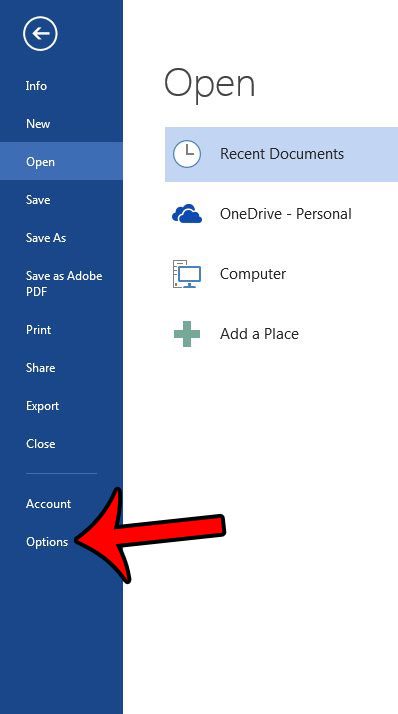
Step 3: Click the Options button at the bottom of the column on the left side of the window.
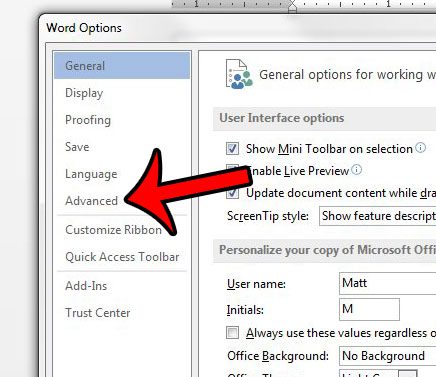
Step 4: Click the Advanced tab on the left side of the Word Options window.
Step 5: Scroll down to the Show document content section of the menu, then check the box to the left of Show text boundaries. Click the OK button at the bottom of the window to apply your changes.
Our tutorial continues in the next section with additional discussion on text boundaries and visually displaying document margins in Microsoft Word.
More Information on How to Show Margin Lines in Word
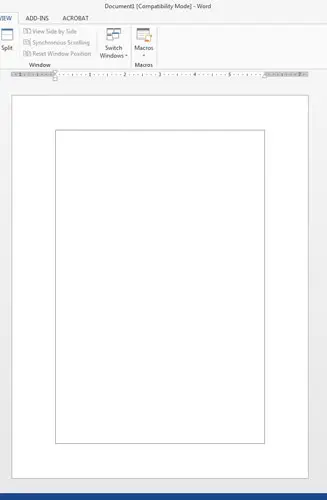
You should now have a dotted line surrounding the content area of your document. In a blank document with default margins, it should look similar to the image below. If you need to adjust the size of the margins in your document then you can do so by clicking the Layout tab (or the Page Layout tab, depending on your Word version) at the top of the window, then clicking the Margins button in the Page Setup group of the ribbon. There are a handful of preset margin options on the drop down menu here but, if you don’t see the ones you need, you can select Custom Margins and enter your own. If you select Custom Margins you will open a Page Setup dialog box. Here you will find three tabs – Margins, Paper, and Layout, where you can pick a lot of the settings that you might need for your document layout. Aside from the page margins, this includes things like page orientation, paper size, vertical alignment, and more. The margins for your documents can also be indicated with the horizontal and vertical rulers that appear at the side of the document. The gray space on the top and bottom of the vertical ruler indicates the top margin and the bottom margin. The gray space on the left and right side of the horizontal ruler indicates the left margin and the right margin. You can still add content to the area at the top of the page. Learn how to add a header in Word 2013 and enter information that will appear at the top of every page of your documents, such as a page number or author name.
Additional Sources
After receiving his Bachelor’s and Master’s degrees in Computer Science he spent several years working in IT management for small businesses. However, he now works full time writing content online and creating websites. His main writing topics include iPhones, Microsoft Office, Google Apps, Android, and Photoshop, but he has also written about many other tech topics as well. Read his full bio here.


