However, this is not a good idea. For example, outlook could automatically open an email in the Reading Pane that contains something that can harm your computer. By default, you should view the sender and the subject line without opening the email. You can set each folder in your email account in Outlook to not show the Reading Pane. However, if you have a lot of folders, that can be time-consuming. Today, we’ll show you how to turn off the Reading Pane for all your folders in an email account at once in Outlook.
Apply the Current View to All Other Folders
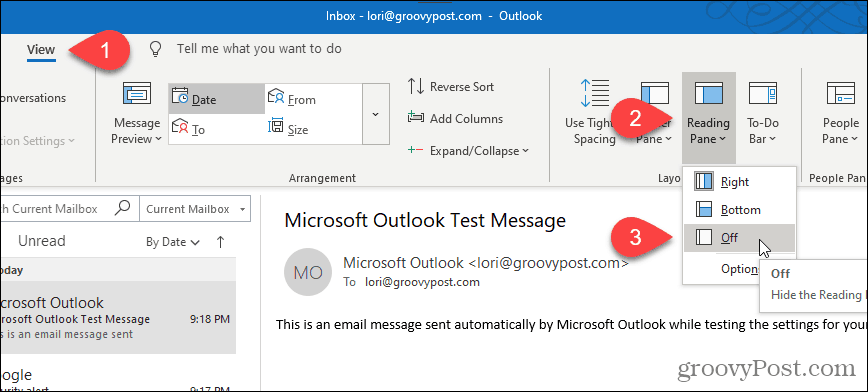
One way to turn off the Reading Pane for all folders is to turn it off for one folder and apply that current view to all other folders. First, go to the Inbox (or any other folder) in your email account. Click the View tab and then click Reading Pane in the Layout section and select Off.
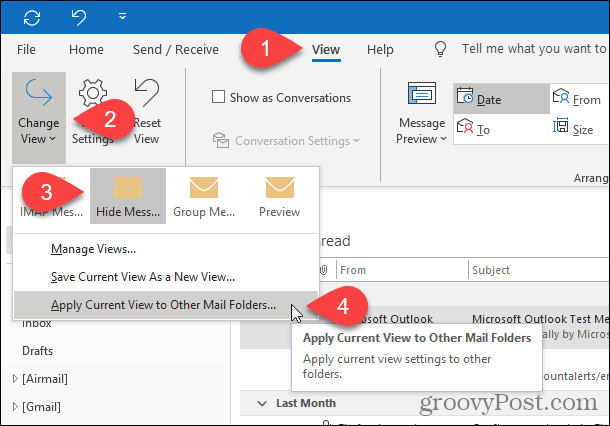
The Reading Pane turns off in the selected folder. To apply this view to all other folders in the current email account, click Change View on the View tab. Then, click Hide Messages and select Apply Current View to Other Mail Folders.
If you’re in a Microsoft Exchange email account, the Change View drop-down menu looks a bit different. When you click Change View, click either Compact or Preview and then select Apply Current View to Other Mail Folders.
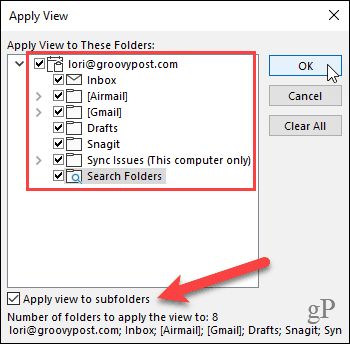
On the Apply View dialog, check all folders under the specified email account, and check the Apply view to subfolders box. Click OK.
The Reading Pane is turned off in all the folders in the current email account. Therefore, if you have multiple email accounts in Outlook, you must go through the above procedure for each email account. Outlook remembers your settings each time you open the program, so the Reading Pane should be off for all folders the next time you open Outlook.
Reset All Views to the Default View
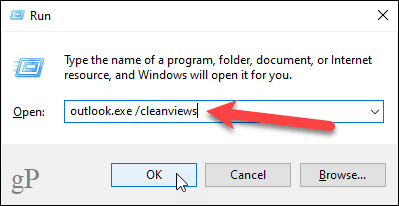
If for some reason, the Reading Pane is not turned off for one or more folders after performing the steps in the previous section, there may be custom views applied to those folders. To fix this, you can reset all views to the default view using the cleanviews switch. Then, you can follow the steps in the previous section again to turn off the Reading Pane for all folders. Press the Windows key + R to open the Run dialog. Enter the following line into the Open box and click OK or press Enter.
Outlook opens with all the view settings set to the defaults.
Start Outlook With Reading Pane Off By Default
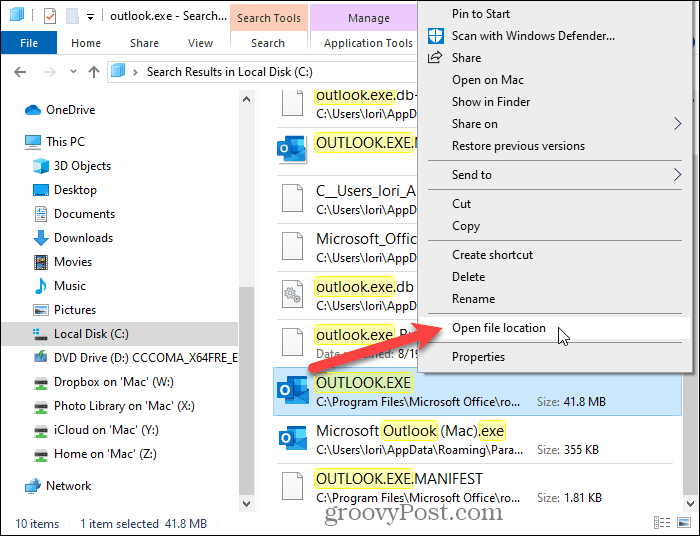
To make sure Outlook starts with the Reading Pane off by default, you can set up a special Outlook shortcut on your desktop. This method also turns off the Reading Pane for all email accounts in Outlook. Before creating the shortcut, you need to get the path to the OUTLOOK.EXE program file. Open File Explorer and select Local Disk (C:) on the left. Then, type: outlook.exe in the search box in the upper-right corner of the window. Look for OUTLOOK.EXE in the list of results and select it.
Right-click on the OUTLOOK.EXE file in the list of results and select Open file location.
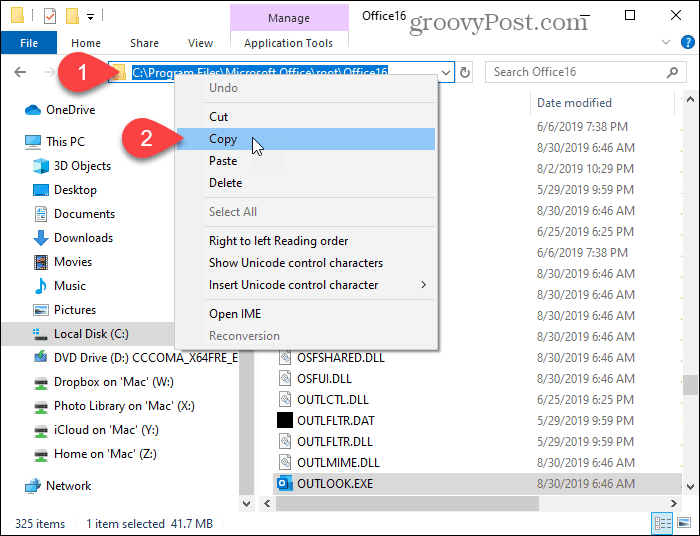
Click on the address bar at the top of the window. The path is automatically selected. Right-click on the selected path and choose Copy from the popup menu.
Now, right-click on an empty area of the Windows desktop and then go to New > Shortcut.
In the Type the location of the item box on the Create Shortcut dialog, press Ctrl + V to paste the path you copied. Then, click Next.
Enter a name for your shortcut in the Type a name for this shortcut box, and click Finish.
The new Outlook shortcut is added to your desktop. Double-click the shortcut to open Outlook.
The Reading Pane is automatically turned off for all folders in all your email accounts.
The Reading Pane May Seem Convenient, But Beware…
Even though it’s not smart to use the Reading Pane, it can be useful at times. For example, you can use it to preview emails without marking them as read or sending read receipts. You can also customize the fonts used in the Reading Pane. Just be very careful if you use the Reading Pane. It could automatically open a dangerous email that could harm your computer.
![]()
