Slides in a presentation in Powerpoint 2013 can be hidden for a number of reasons. But if you elected to hide a slide rather than delete it, then you may have anticipated that you would need it again in the future. If you are now in the situation where you need a hidden slide to appear in your presentation, then you may be looking for a way to restore that hidden slide to its proper place in the slide show. Our tutorial in this article will show you how to unhide a slide that has previously been hidden in Powerpoint 2013.
How to Unhide Hidden Slides in Microsoft Powerpoint
Our guide continues below with additional information on unhiding slides in Powerpoint. Would your presentation be helped with the addition of a professional timeline graphic? Our article on how to add a timeline in Powerpoint can show you how to make one.
How to Hide or Unhide Slides in Powerpoint 2013 (Guide with Pictures)
The steps in this article will assume that you have a Powerpoint presentation that contains at least one hidden slide, which you would like to unhide. Hidden slides work a little differently than hidden objects in other Office programs, such as Excel, where you might hide a row or a column. Hidden Powerpoint slides are still displayed in the slide panel at the left side of Powerpoint, but will not be included when you actually present the presentation from the Slide Show tab.
Step 1: Open your presentation in Powerpoint 2013.
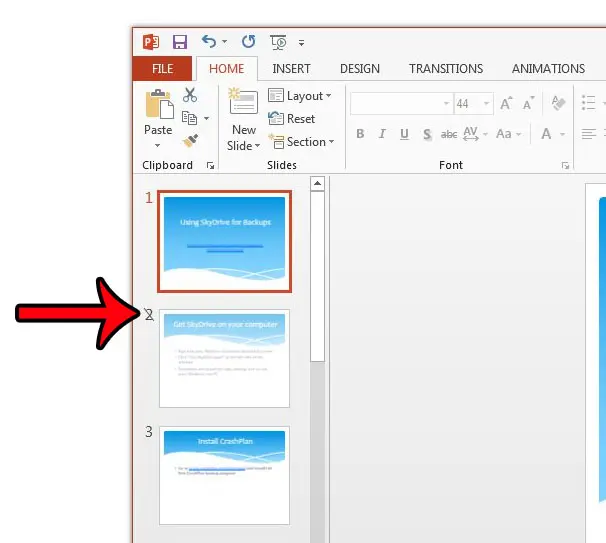
Step 2: Locate the hidden slide that you wish to unhide in the column at the left side of the Powerpoint window.
Hidden slides have a diagonal slash through their slide number. For example, slide 2 is hidden in the picture below.
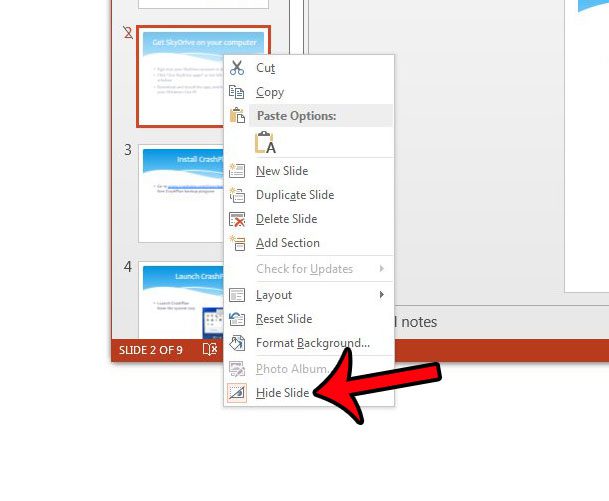
Step 3: Right-click the hidden slide, then click the Hide Slide (or Hide Slides if it’s multiple slides) option.
This may seem a little counter-intuitive, but there is no dedicated “Unhide” option in Powerpoint 2013. Once the slide is unhidden, the diagonal slash through the slide number will be removed. Our tutorial continues below with additional discussion on working with hidden slides.
Will Hiding Slides in Powerpoint Make It Impossible for Others to Edit Them?
When you start to hide and unhide slides in Microsoft Powerpoint you can get a little confused about how to Hide Slide option works. Basically, you are only hiding a slide from the audience to whom you are presenting the slideshow. So if you are going to be displaying it on a projector or through an online meeting application like Microsoft Teams or Zoom, then they won’t see any Powerpoint slide that you have hidden. But if you click hide slide on a single slide or hide multiple slides then share the slide show file with other people, they will be able to see those hidden slides in the Slides pane at the left side of the window. Anyone that has editing access for your Powerpoint file will be able to view all of the slides in that presentation, regardless of their hidden or unhidden status.
More Information on How to Unhide a Slide in Powerpoint 2013
One of the key benefits of hiding slides in Powerpoint is that you can keep them in the presentation, but not include them when giving that presentation. That means that if you have one presentation that you need to show to multiple groups, but each group’s presentation is slightly different, you can simply adjust the visibility of certain slides within one presentation rather than needing to manage multiple slideshows. If you have multiple hidden slides in your presentation and would like to unhide all of them, then click one of the slides at the left side of the window, and then press Ctrl + A on your keyboard to select all of them. Right-click on one of the slides and click the Hide Slides option. This will hide all of the slides. Right-click on one of the slides again and click the Hide Slides option again, which will unhide all of them. If you are using the Hide Slide button a lot then you may want to consider using the Slide Sorter view to manage your slides. You can access this by selecting the View tab at the top of the window, then clicking the Slide Sorter option in the Presentation Views group of the ribbon. This removes the slide editor panel from the center of the screen and displays all of your slides in a grid pattern. You can hide and unhide Powerpoint slides in the Slide Sorter view the same way as you do in the Normal view. Simply right-click on a slide thumbnail then choose the Hide Slide option. If you want to hide other slides in this view then you would need to hold down the Ctrl key on your keyboard to select multiples. You can then click on any selected slide and select Hide Slide from the list of options. If you are hiding slides in a Powerpoint presentation, then slide numbering can get a little confusing for your audience. Learn how to remove slide numbers in Powerpoint 2013 if the numbering is becoming an issue.
Additional Sources
After receiving his Bachelor’s and Master’s degrees in Computer Science he spent several years working in IT management for small businesses. However, he now works full time writing content online and creating websites. His main writing topics include iPhones, Microsoft Office, Google Apps, Android, and Photoshop, but he has also written about many other tech topics as well. Read his full bio here.
You may opt out at any time. Read our Privacy Policy